Showing posts with label Mac. Show all posts
Showing posts with label Mac. Show all posts
Thursday, April 19, 2012
New Internal HDD
This forum discussion has advice for how to restore everything after installing a new HDD. Do we have the OSX disc somewhere?

Thursday, March 29, 2012
Shortcut to Sound Preferences
All I had to do was google it.
http://sanziro.com/2011/07/shortcut-to-access-sound-preferences-on-mac-os-x.html
http://sanziro.com/2011/07/shortcut-to-access-sound-preferences-on-mac-os-x.html
Monday, March 26, 2012
Holy Loaf Don't Delete Timemachine Backups!
So that's a big no-no. Logically, though, there's no warning pop-up or "are you sure" dialog box, it just lets you do it and then some nasty bit of OS schizophrenia rattles around in there like a drunken wad of razorwire with parkinson's.
So, point is, there's no good way to limit the size of a timemachine backup file. You have to either partition the drive, or fill it up with everything you ever want on it BEFORE setting it up as a timemachine drive.
I did eventually fix it by formatting the external harddrive. Pretty drastic right? I tried some utilities that were supposed to "force empty" the trash (heh), but they didn't work. Trash It and...uh...Cocktail. They said stuff like, "be patient" and "it may take a bit if you're deleting timemachine files," but I couldn't find any indication of what time-scale "a bit" was measured on. A bit like a whole 10 seconds, or a bit like "I'm worried about this because I haven't turned my computer off for a month?"
Whatever. Don't do that again. Better to buy another GD ex-HD.
So, point is, there's no good way to limit the size of a timemachine backup file. You have to either partition the drive, or fill it up with everything you ever want on it BEFORE setting it up as a timemachine drive.
I did eventually fix it by formatting the external harddrive. Pretty drastic right? I tried some utilities that were supposed to "force empty" the trash (heh), but they didn't work. Trash It and...uh...Cocktail. They said stuff like, "be patient" and "it may take a bit if you're deleting timemachine files," but I couldn't find any indication of what time-scale "a bit" was measured on. A bit like a whole 10 seconds, or a bit like "I'm worried about this because I haven't turned my computer off for a month?"
Whatever. Don't do that again. Better to buy another GD ex-HD.
Friday, March 2, 2012
Hum on USB Headset Mic
According to this site, the kind of hum I was getting through the mic is caused by electrical something-or-other. Point is - I get it when the laptop is running on battery, but not when it's plugged in.
Monday, February 13, 2012
Mic Auto-Adjust
Google Voice and Skype both automatically turn the volume on my microphone all the way up. I hate this, especially since the mic is about an inch from my mouth and nose, both of which (whom?) make a whole host of noises I never want to hear again. There's a reason they're not audible at normal speaking distances - it's friggin weird, even just to hear someone breathing.
So!
For Google Talk (still don't know how that's different than Google Voice) downloaded PrefSetter.app, and changed "audio-flags" to 1.
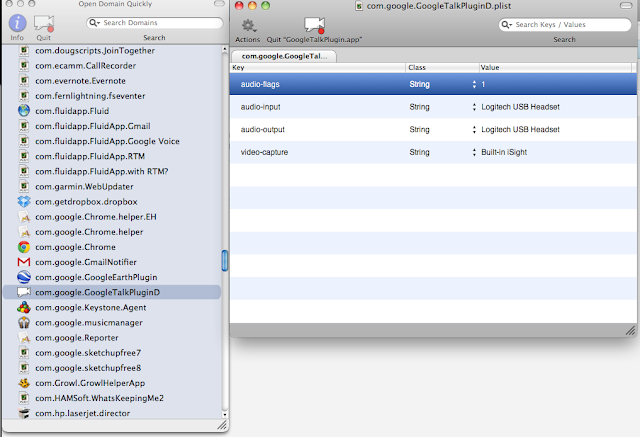
So far I have to reset it for every call. I tried doing it with Chrome all quitted, and then restarting (someone somewhere said I should), but it still resets to 3 pretty often.
For Skype:
I'm gonna try this guy's thingy.
Okay, that doesn't work either, not even a little bit. Bargh.
Now tried this one: seems good so far.
UPDATE 06-06-12
Skype's latest has an option to turn off mic auto-adjusting. Ta da!
So!
For Google Talk (still don't know how that's different than Google Voice) downloaded PrefSetter.app, and changed "audio-flags" to 1.

So far I have to reset it for every call. I tried doing it with Chrome all quitted, and then restarting (someone somewhere said I should), but it still resets to 3 pretty often.
For Skype:
I'm gonna try this guy's thingy.
Okay, that doesn't work either, not even a little bit. Bargh.
Now tried this one: seems good so far.
UPDATE 06-06-12
Skype's latest has an option to turn off mic auto-adjusting. Ta da!
Thursday, January 26, 2012
Recording Gchat Calls with Headset
Used these sources:
Pretty
Also Pretty
Ugly
Here's what to do:
Download Line-In and Soundflower.
Go to System Preferences -> Sound -> Output Device and pick the headphones/mic thing.
Set Line-In to run what it gets from the microphone to Soundflower:

"Pass Thru" apparently is like an on-off switch. It's meant to be temporary.
Go to Gmail settings - Chat and set Soundflower as the output device and your microphone as the input device. [NO! Set the headset thingy to both input and output!]
Set Soundflower to use the microphone as the 2-channel device.

Go to Audacity -> Preferences -> Devices and set Soundflower (2ch) for the recording device.
I think you can duplicate/totally-mess-up some of this by doing it in the System Preferences. I don't think I'm going to mess with that for now.
Can't remember how to turn off the doubly echo thing. Annoying. I know I fixed it once already...


Pretty
Also Pretty
Ugly
Here's what to do:
Download Line-In and Soundflower.
Go to System Preferences -> Sound -> Output Device and pick the headphones/mic thing.
Set Line-In to run what it gets from the microphone to Soundflower:

"Pass Thru" apparently is like an on-off switch. It's meant to be temporary.
Go to Gmail settings - Chat and set Soundflower as the output device and your microphone as the input device. [NO! Set the headset thingy to both input and output!]
Set Soundflower to use the microphone as the 2-channel device.
Go to Audacity -> Preferences -> Devices and set Soundflower (2ch) for the recording device.
I think you can duplicate/totally-mess-up some of this by doing it in the System Preferences. I don't think I'm going to mess with that for now.
Can't remember how to turn off the doubly echo thing. Annoying. I know I fixed it once already...
- Things I've tried:
- muting various things in the midi settings through soundflower
- switching around the line-in settings
- messing with volumes in audacity and system settings
- switching things in system settings (make less difference than you'd think)
Okay, got it.
To Get Rid of Annoying Micro-Delay Echo Torture: I need to stop Soundflower from playing the audio through the headset, so that means I also need to have Gchat go straight to the headphones in stead of going through Soundflower (see black and orange note above).
So that looks like this in the Soundflower menu:

Also need to make sure Soundflower volume is up in the System Sound settings, because I'm pretty sure this affects how loud it is in the Audacity recording, compared to my mic'd voice. Watch the waveform as it records to make sure:

Also make sure that I click on "Logitech USB Headset" after adjusting Soundflower volume, or I won't be able to hear anything.
This is probably a really dumb way to do this...
UPDATE:
And it WAS a really dumb way to do it. Never got it to work consistently. Just bought Audio Hijack Pro. Other than auto-adjusting mic (another post), everything works fine.
UPDATE:
And it WAS a really dumb way to do it. Never got it to work consistently. Just bought Audio Hijack Pro. Other than auto-adjusting mic (another post), everything works fine.
Sunday, December 18, 2011
Switching to Gmail
Forwarding:
Forwarding wsumail to Gmail - I think the student mail is forwarding to both or something - I can't remember how I set that up...
I was stupid, and erased my server account before double-checking that I could transfer old messages easily. So I have a few years of old email on my harddrive and I'm trying to get them onto Gmail so I can search them all at once.
Mail.app has an "import" option that should let me just import all those messages, but it says "no valid files found" or something like that. I know they're there, and I can search them through spotlight, but I want it all in Gmail.
Emailchemy would work, but it's dumb expensive for a once-in-a-lifetime fix.
So, now trying to import into Thunderbird, then IMAP them into Gmail.
Seems to be working fine - and Thunderbird is much better looking than last time I had to use it to save Mail.app from its own blackhole. It also has a lot of add-ons and extensions. I used one to delete all the duplicate messages in one folders. Don't know why, but there were 5 of each message in there.
Also installed Gmail offline so that my mail will be backed up on my computer.
Growl Notifications:
Fluid.app is a really easy way to have a dock icon and app switcher icon - even includes unread badge.
If I pay for it, I can use a script from here, which will allow Growl notifications from the fluid.app.
(If I don't like this script maybe I could figure out a new one with help.)
I've installed a Chrome extension that's supposed to do gmail desktop notifications, and there's an option in the gmail settings to do it too, but it's not working right now. Not super important, since the badge makes it pretty obvious when I have mail, but the extension was cool because you can archive them and stuff right from the pop-up.
Couldn't get the script to work - always showed at least two notifications. So NOW i'm using the Google notifier (with the autoupdate interval decreased by this method), combined with the Google+Growl add-on thinger. I changed the icon that showed on the Growl notifications by just copy-and-pasting a different icon in the top right of the Get Info pane of the Notifier app.
Forwarding wsumail to Gmail - I think the student mail is forwarding to both or something - I can't remember how I set that up...
I was stupid, and erased my server account before double-checking that I could transfer old messages easily. So I have a few years of old email on my harddrive and I'm trying to get them onto Gmail so I can search them all at once.
Mail.app has an "import" option that should let me just import all those messages, but it says "no valid files found" or something like that. I know they're there, and I can search them through spotlight, but I want it all in Gmail.
Emailchemy would work, but it's dumb expensive for a once-in-a-lifetime fix.
So, now trying to import into Thunderbird, then IMAP them into Gmail.
Seems to be working fine - and Thunderbird is much better looking than last time I had to use it to save Mail.app from its own blackhole. It also has a lot of add-ons and extensions. I used one to delete all the duplicate messages in one folders. Don't know why, but there were 5 of each message in there.
Also installed Gmail offline so that my mail will be backed up on my computer.
Growl Notifications:
Fluid.app is a really easy way to have a dock icon and app switcher icon - even includes unread badge.
If I pay for it, I can use a script from here, which will allow Growl notifications from the fluid.app.
(If I don't like this script maybe I could figure out a new one with help.)
I've installed a Chrome extension that's supposed to do gmail desktop notifications, and there's an option in the gmail settings to do it too, but it's not working right now. Not super important, since the badge makes it pretty obvious when I have mail, but the extension was cool because you can archive them and stuff right from the pop-up.
Couldn't get the script to work - always showed at least two notifications. So NOW i'm using the Google notifier (with the autoupdate interval decreased by this method), combined with the Google+Growl add-on thinger. I changed the icon that showed on the Growl notifications by just copy-and-pasting a different icon in the top right of the Get Info pane of the Notifier app.
Tuesday, August 30, 2011
Network Drives OS X
Problem: They disappear every time you restart.
Sort of maybe a solution:
1) Can add them to the "Login Items" in the Accounts preferences, but then it tries to open a Finder window to that site every time you log in. Annoying, and I'm not sure how desperate the error is if it can't find it.
2) Add it as a Dock icon
Sort of maybe a solution:
1) Can add them to the "Login Items" in the Accounts preferences, but then it tries to open a Finder window to that site every time you log in. Annoying, and I'm not sure how desperate the error is if it can't find it.
2) Add it as a Dock icon
- Right-click in Sidebar, go to "Open Sidebar Preferences..."
- Click on General light-switch thingy
- Under "Show these items on Desktop" make sure "Networked Drives" is checked
- Connect to server
- Drag icon from Desktop into Dock (has to go in the documents section, not apps section
Vough Oil Laugh.
Thursday, January 6, 2011
Automator and Avoiding Real Work
I thought of another thing I'd like to automate:
It'd be cool if all the papers I was working on had Aliases on the Desktop. This would be annoying though, because I Save As... a new draft every time I delete more than a paragraph. So, I think I'm going to try to make a "New Draft" workflow where I can just clickit and it will Save As a new draft, delete the old alias and make a new alias.
I probably shouldn't be messing with this stuff because there's a chance I'll find a way to delete everything that matters in my professional life. But....but nothing. It's better than actually working.
Sweet! I made one that actually works!
It'd be cool if all the papers I was working on had Aliases on the Desktop. This would be annoying though, because I Save As... a new draft every time I delete more than a paragraph. So, I think I'm going to try to make a "New Draft" workflow where I can just clickit and it will Save As a new draft, delete the old alias and make a new alias.
I probably shouldn't be messing with this stuff because there's a chance I'll find a way to delete everything that matters in my professional life. But....but nothing. It's better than actually working.
Sweet! I made one that actually works!
- You have to save a Workflow into: You/Documents/Microsoft User Data/Word Script Menu Items
- Then it goes:
- All the "Rename Finder Items" are Replace texts to change the Draft Number
- It'd be easier to just mark each new one with the date, but I don't like that
- So it goes in reverse order, with the first one being the highest draft number possible (if it doesn't go in reverse it will just keep renaming it until it's the highest number)
- The last find and replace is to remove the word "copy" from the filename, which was put there by the "Duplicate Finder Item" thinger. You actually have to replace " copy" with the space before the word, otherwise it adds a space each time you rename it.
- It'd be nice if it could move the old Word file into my Drafts folder.
- I can't figure this out because each project's Drafts folder has a different path, and I can't find a way to make the "Move Finder Item" thinger work based on a variable
- It'd be nice if it could delete the old Aliases on the desktop
- Pretty much the same thing. I could make it erase all the Aliases? Or all the ones over a certain age, or that haven't been used in a certain amount of time, but I don't like the way that will mess up other aliases. I could add a label to all the aliases created this way, and then only delete the ones with that label that haven't been used in a certain amount of time...but...what if I don't work on an article for a while?
- I sorta got this to work. Added: Get Finder Items -> Move Finder Items to Trash
- You have to right-click "Get Finder Items" and choose "Ignore Inputs" or it deletes the Alias you just made.
- Buuuuut...it doesn't delete the previous Alias, for some reason.
- Mini-UPDATE: The "Move Finder Items to Trash" command seems to be deleting the word file as well, so I took that out and just manually delete Aliases as they become unwanted. That's actually not any extra work, because I like these Aliases to be in a specific place on the desktop, so I'm messing with them anyway.
I bet I could do this in Python too...I mean, I don't know how, but I bet I could learn in time. That way it could be an unlimited number of drafts, and I bet I could even get it to move the file to the Drafts folder. Someday...
Automater Un-Plug
Having failed terribly to automate the disc-switcha, I decided to waste more time in a doomed, nihilistic time-saving effort.
Goal: Automate all the things I have to do every time I move the laptop.
So I want a one-double-click option to unmount my external harddrives (which requires shutting down iTunes), and shutdown Parallels Virtual Desktop (because it gets sad and confused when I close the laptop without warning it first).
Attempt 1: Automator Workflow (FAIL)

Goal: Automate all the things I have to do every time I move the laptop.
So I want a one-double-click option to unmount my external harddrives (which requires shutting down iTunes), and shutdown Parallels Virtual Desktop (because it gets sad and confused when I close the laptop without warning it first).
Attempt 1: Automator Workflow (FAIL)
- I guess I actually wanted an application.
Attempt 2: Automator Application
- Open Automator (I use spotlight)
- Do as such:

- Where "WD-Blackbook" and "Wallet" are the names of my external harddrives. They have to be plugged in to find them in the "Get Specified Finder Items" tool thingy.
- Remaining questions:
- I have my Parallels Virtual Machines configured to "Suspend" when the application is closed (Configure -> "Startup and Shutdown" tab, "On Window Close" option). I wonder if this is going to make everything stupid and angry. I read that the Suspend mode just saves the state of the VM in a file somewhere (instead of losing that information or saving it in the RAM), but I wonder how big those files are, and how they deal with lots of them.
- I guess it's still an issue if there's an application open in one of the VM's. Maybe, maybe not.
Thursday, December 30, 2010
Automatated Back-Up Disc Switching
I have an external harddrive at work and a different one at home that both have Time Machine back-ups. I'm inconceivably lazy, and got tired of going to the Time Machine settings every time I brought the laptop home.
Soooooo.....this guy told me how to fix it up nice. I'm not smart, and I couldn't really figure out what he was doing, so anything dumb is my fault, anything smart is his doing.
1. Copy a smarter person's scripts
- This is because I don't know any of the syntax for the commands. I'm copying the aforementioned "this guy."
2. Download Marco Polo.
- It's a program that tries to figure out where you are based on what USB devices you have, and a bunch of other things. Pretty cool.
- You need it because it also has the option to automatically perform actions based on the "context" it detects.
- When TimeMachine is using the right harddrive, open "Terminal" and copy this exact text in:
defaults read /Library/Preferences/com.apple.TimeMachine BackupAlias
- It gives you a butt-ton of numbers and letters. That's apparently more easier for computer brains to deal with. They are weird.
"This guy" says "write a little shell script." He might as well have said "drink the froth forthwith," because I got no idea what that means in terms of what I actually need to do. The next 9 steps are me trying "write a little shell script."
4. Make a text file with the smarter person's scripts
- I used TextEdit.
- The actual content of the text file should be:
#!/bin/bash
defaults write /Library/Preferences/com.apple.TimeMachine BackupAlias '<a whole paragraph of numbers and letters that you got from step 3>'
/System/Library/CoreServices/backupd.bundle/Contents/Resources/backupd-helper &
killall Terminal
- You have to go Format -> Make Plain Text before you save it. This is because TextEdit defaults to Rich Text Format, and apparently that richness just acts like coagulated fat in the streaming veins of intercomputer communication.
- Save it on Desktop (you can save it other places, but there's some weirdness with "Paths" that I don't understand)
- This does three things: First it switches the harddrive being used for TimeMachine, then (the /System/Library....line) it makes it start a new back up (otherwise it doesn't do it for a while and you might switch again before backing anything up) and then it KILLS ALL TERMINALS! BWA HA...no. It just quits that program because otherwise the little window stays there, and it bugged me.
- The last two command are different than "this guy's," because I couldn't get his to work.
- Two parts:
- First, change the name of the file manually so that it ends with ".command"
- Second, open terminal and paste this text, replacing You with your user name and FileName with the actual name of the file
chmod 755 Users/You/Desktop/FileName.command
- This apparently gives you permission to run the program. I don't think I need permission from a little texty box on my computer, but...I am apparently wrong.
6. Tell MarcoPolo to run your program
- Preferences -> Actions, add an open type of action, and pick your ".command" file in the Open File... dialog that pops up.
- I set a rule to use the harddrive as a USB device to determine the context at 100% confidence. I wonder what would happen if I connected both harddrives at once?
- I think it's also good to set a delay, just to make sure everything's all connected and happy before trying to start the backup.
- It sounds like wifi isn't a good thing to use for rules because it's iffy and hard to monitor, so probably use other stuff.
- A good way to test it is to right-click the menu bar icon and go Force Context -> Automatic. Then, if your Rules are working, it will switch to the new one and (hopefully) switch backup disks.
- Marco Polo doesn't automatically run when you start up the computer, and it's not in the Dock so I didn't know how to make it do that.
- It's easy, just do what this other guy or possibly lady says.
8. Be amazed that I figured this out!
- It only took three hours. I am not productive.
UPDATE 12-29-10: I took out the "killall Terminal" command and replaced it with "Exit." It leaves the Terminal program running, but I think the "killall" just ends the backup processes I asked it to start.
UPDATE 12-30-10: There's an annoying pop-up that the "identity of the backup disk has changed since the previous backup" that comes up with this. Then the TimeMachine preferences pane pops-up, and you have to close it and the Terminal, which really isn't saving me any time at all. I don't like it, so I tracked down alternative solutions. The problem with that approach is that you have to edit the TimeMachine preferences files, and I'm not sure I want to be doing that.
Update 12-30-10 + about 10 minutes: This forum tells how to solve this. It says the problem is that you have to tell TimeMachine two things about the change, so you have to first get the DestinationUUID using
Then add this a line so that the new script looks like:
But I did that, and it's not working...yet.
UPDATE (FAIL): I give up and I hate this.
UPDATE (STILL FAIL): I tried this guy's GUI scripting technique. I couldn't get the script to run with Marco Polo, so I tried Do Something When. It ran, but it stopped before picking the right disc, and it bugged me watching it go. So. That.
UPDATE 12-30-10: There's an annoying pop-up that the "identity of the backup disk has changed since the previous backup" that comes up with this. Then the TimeMachine preferences pane pops-up, and you have to close it and the Terminal, which really isn't saving me any time at all. I don't like it, so I tracked down alternative solutions. The problem with that approach is that you have to edit the TimeMachine preferences files, and I'm not sure I want to be doing that.
Update 12-30-10 + about 10 minutes: This forum tells how to solve this. It says the problem is that you have to tell TimeMachine two things about the change, so you have to first get the DestinationUUID using
defaults read /Library/Preferences/com.apple.TimeMachine DestinationUUIDNote that if this prints out with hyphens you have to delete them. Also, make sure you have the right harddrive selected in TimeMachine - it prints out the DestinationUUID of whatever it's currently using for backups.
Then add this a line so that the new script looks like:
#!/bin/bash
defaults write /Library/Preferences/com.apple.TimeMachine BackupAlias '<a whole paragraph of numbers and letters that you got from step 3>'
defaults write /Library/Preferences/com.apple.TimeMachine DestinationUUID '<a few numbers and letters from above>'
/System/Library/CoreServices/backupd.bundle/Contents/Resources/backupd-helper &
Exit
UPDATE (FAIL): I give up and I hate this.
UPDATE (STILL FAIL): I tried this guy's GUI scripting technique. I couldn't get the script to run with Marco Polo, so I tried Do Something When. It ran, but it stopped before picking the right disc, and it bugged me watching it go. So. That.
Monday, December 13, 2010
Word Crash
For some reason I've decided not to really swear in these. It's a large challenge at this point. I am unhappy.
Mac Word 2008 (not swearing) was bad. It crashed a lot, and most ironic-in-the-Sophocles-kind-of-way, AutoSave made it crash, so there was usually no way to recover whatever you'd done since the last paranoid tic quicksave.
Mac Word 2011 (not swearing) should be better. It does not seem to be. I'm not swearing. I'm disabling the Autosave to see if that does anything, but I can't find anyone else on the WorldWideTweetoBlogoSphere complaining about it, so maybe that's not it.
Mac Word 2008 (not swearing) was bad. It crashed a lot, and most ironic-in-the-Sophocles-kind-of-way, AutoSave made it crash, so there was usually no way to recover whatever you'd done since the last paranoid tic quicksave.
Mac Word 2011 (not swearing) should be better. It does not seem to be. I'm not swearing. I'm disabling the Autosave to see if that does anything, but I can't find anyone else on the WorldWideTweetoBlogoSphere complaining about it, so maybe that's not it.
Thursday, November 18, 2010
When OS Updates Break Growlmail
http://lug.wsu.edu/node/2542
Updates some computer thing in the RAM box processor thermal unit.
ASSUMING that it's broken because of Apple's odd policy of making all updates superficially incompatible with Mail bundles. If it's broken for any other reason, this might actually make it worse.
UPDATE: Okay, this didn't actually work. I'll just wait for Growl to update their app.
Updates some computer thing in the RAM box processor thermal unit.
ASSUMING that it's broken because of Apple's odd policy of making all updates superficially incompatible with Mail bundles. If it's broken for any other reason, this might actually make it worse.
UPDATE: Okay, this didn't actually work. I'll just wait for Growl to update their app.
Subscribe to:
Posts (Atom)